The SLR Lounge Lightroom 4 DVD
This tutorial has been transcribed from the SLR Lounge Lightrom 4 DVD, a 14 hour A – Z video tutorial guide on mastering Lightroom 4 including over 6 hours of developing techniques!
Introduction
It is absolutely vital that every photographer using Lightroom has a
full understanding of the Lightroom catalog system in order to prevent
workflow issues. While this article may sound basic, even the most
advanced Lightroom users will probably find some golden bits in this
article, so don’t skip! In this article, we will be covering several
main points which are stated below:
1) Non-Destructive Editing
2) Lightroom Previews
3) Understanding the Catalog System
4) File Management
5) One Catalog or More?
6) Recommended Best Practices
1. Non-Destructive Editing
We commonly hear the term non-destructive editing vs destructive
editing. But, let’s take a brief moment just to discuss it to make sure
we are all on the same page in regards to what is non-destructive
editing. Non-destructive editing simply means that any modifications
made to an image are not changing the original image. This would mean
that with a non-destructive editor (i.e. Lightroom) you would be able to
revert back to the original image at any point in time, regardless of
how long or how many changes have been made. Photoshop on the other hand
would be an example of a destructive editor since changes that are made
to an image are saved directly over the original image, thus
destructively editing the original file. For this reason, when we work
in Photoshop we always suggest that you are work in PSD files and
creating multiple layers to ensure that we preserve each change or step
all the way back to the original file. So, if Lightroom isn’t actually
modifying images, then what are we seeing when we modify develop
settings inside of Lightroom.
2. Lightroom Previews
When we see changes being made inside of Lightroom as we are
adjusting Develop settings, what we are seeing is actually just a
“preview” of what that image would look like were the settings applied
to the image. These settings and changes that we are making, won’t
actually be applied to the image until you “Export” the image from
Lightroom. When you Export the image, Lightroom will take the original
file, process it with the settings that were used on that file, and save
it as a separate file based on your Export Settings.

Message shown in Lightroom 4 when previews are being rendered
Ever notice while moving from one image to the next (particularly in
the Develop Module) that Lightroom pauses and shows “Loading” as shown
above? This is Lightroom preparing the image previews on the fly. To
save time, we always recommend that prior to developing your images you
“Render 1:1 Previews” for all of your images. You can do this by going
into the Library Module, turning off all filters so all images are
visible, then selecting the following from the menu:
Library –> Previews –> Render 1:1 Previews
This will save enormous amounts of time during developing since
Lightroom will no longer have to pause to render a preview when moving
from image to image, or when zooming into an image.
3. Understanding the Catalog System
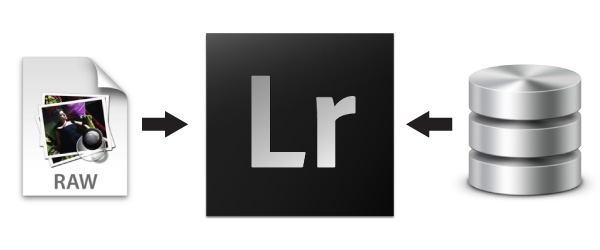
So, given that Lightroom is a non-destructive editor and what we see
inside of Lightroom is simply a preview, then what exactly is being
stored inside of the Lightroom Catalog file? The Lightroom Catalog file,
or .lrcat file, only contains information. In fact, you can think of
the .lrcat file as simply a giant database storing the metadata,
attributes, develop settings and any other organizational information
related to your images. However, the actual images ARE NOT being stored
in the Lightroom Catalog. Lightroom is simply referencing those images
at a particular location on your hard drive. Knowing this is important
because when Lightroom asks you if you want to “backup your Lightroom
Catalog” you know then that you are only backing up the information and
not the actual images themselves.
During import, there is an actual option where you can backup the
actual images in the catalog, however beyond this feature you will need
to make backups of your images on your own. This backup option can be
found by going to the Import Dialogue (Ctrl + Shift + I or Cmd + Shift +
I for Mac).
Then selecting the “Make Second Copy To” option in the File Handling Panel on the right side of the Import Dialogue.
If you wish to make an entire backup of the images within a catalog
along with the catalog file directly from Lightroom, there is one other
option available.
From the Library Module, Right Click on the folder containing your
images in the Folders Panel in the Left Panel display. Select “Export
this Folder as a Catalog” and choose a destination as shown below.
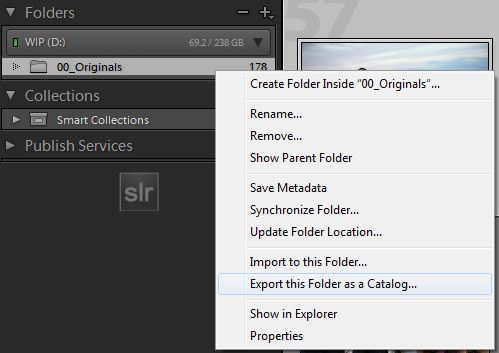
This
option will take all of the images within the folder and export them as
a completely new catalog with its own .lrcat file. It will also
preserve all existing develop settings, metadata, attributes, etc. On a
side note, it is also useful for making a selection of images, and
breaking of just the selected images as a new catalog.
4. File Management
Since Lightroom only stores the information related to your photos,
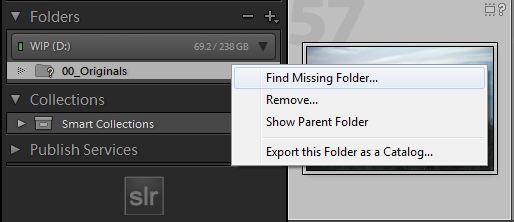
we know that Lightroom has to be pointing or referring to the images
somewhere on your hard drive. If you have ever had the ? appear over an
image in Lightroom, or had Lightroom tell you a file is “missing” it is
because Lightroom has essentially lost the reference to where those
images are located as shown below?
This will happen when you move or rename image locations outside of
Lightroom. In this situation, you simply need to tell Lightroom where
the images have been moved to. For this reason, we recommend putting the
Lightroom catalog and the original images into the exact same folder.
So, for example if we just got back from London and I wanted to
import my images into Lightroom. I might create a new folder called:
2012.03.01 – London Family Trip
Inside of that folder I would have catalog and images stored in the following folders
00_Originals
Catalog
It would look like the following:

Because the images and the catalog file are in the same parent
folder, if I need to move my catalog I can take everything at once by
simply moving the 2012.03.01 – London Family Trip folder. If I rename
the same parent folder to something else, the Lightroom Catalog would
still link to the images correctly since they are stored in the
00_Originals folder inside of the parent folder.
However, if I need to change the name of the 00_Originals folder at
any point in time, this is a change that you will want to make from
Lightroom by Right Clicking on the folder and “Renaming” it. If you make
this change from your OS file system, then the image locations will be
broken inside of Lightroom, and you must update it manually.
If your images are missing, to update the location simply Right Click
again on the Folder and select “Find Missing Folder” selecting the new
updated location for your images as shown below.
5. One Catalog or More?
We often are asked whether photographers should have only one
Lightroom Catalog for all of their images, or have multiple Lightroom
Catalogs for every single shoot. There are most certainly benefits to
each, the two primary benefits are discussed below:
Catalog Size – The biggest drawback to having a
single catalog file for all your images is the catalog size. Despite
what Adobe says, Lightroom catalogs do indeed slow as the catalog sizes
increase. Now, this isn’t typically noticeable until you reach around
15,000 + images within a single catalog. However, there is a difference.
If you do have large catalog sizes, we would recommend using the File
–> Optimize Catalog feature from time to time to optimize the catalog
efficiency. The other downside to having large catalogs is having large
image folders where your images are stored. Transferring or backing up
from one drive to another can become extremely cumbersome.
Usability – The biggest benefit to having a single
catalog file for all your images is the fact that all your images can be
searched, found and edited within a single Lightroom catalog. Since
Lightroom catalogs are independent of each other, images within other
catalogs cannot be searched and found from Lightroom, unless that
specific catalog is open.
6. Recommended Best Practices
So, in regards to the question above, here is what we would
recommend, though each one of you will need to make the final decision
on your own depending on your workflow and preferences:
The Casual Shooter – For the casual shooter that
shoots maybe 10 – 25 pictures a week, we would recommend that you put
all of your images into a single Lightroom catalog as you will benefit
most from having all of your images stored in one single location.
Perhaps every 10 years or so, when your catalog exceeds 15,000 – 20,000
images, then you might want to archive your existing Lightroom catalog
and create a new one.
The Frequent Shooter – For the frequent shooter who
captures around 50 – 250 images a week, I would recommend that you
create a yearly Lightroom catalog file. This will make sure your
Lightroom catalogs still remain efficient in terms of speed, while still
having decent usability given that to find a particular image, you just
need to know the year it was shot.
The Event Shooter – For the event shooter who
frequently captures around 1000+ images per event/shoot, I would
recommend that you create a Lightroom catalog for each client/event. For
the event shooter, efficiency is the primary priority since you need to
be able to move through catalogs, edit, transfer and archive at a good
speed. The downside here is to find images for say a portfolio, you will
need to pull up each client’s catalog.
7. The Lightroom 4 DVD
We hope you enjoyed this tutorial! For those of you that truly want
to master every facet of Lightroom 4, be sure to check out the SLR Lounge Lightroom 4 DVD .
Quoted as the best and most comprehensive video tutorial guide with
nearly 14 hours of education covering every LR4 topic from A – Z
including over 6 hours of basic and advanced developing techniques
specifically for Lightroom 4.
Read more: http://digital-photography-school.com


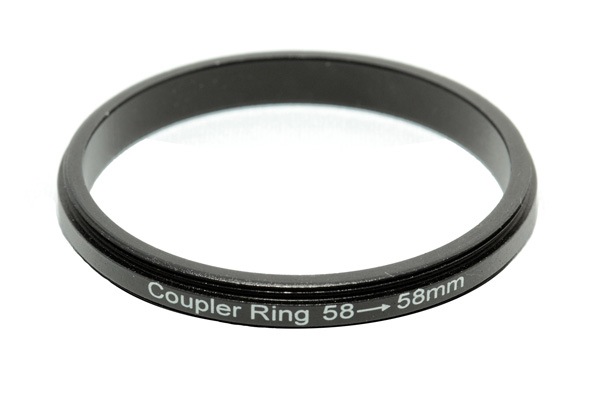 Use a coupling ring (shown above) to attach your reversed lens to
another lens. The reversed lens acts like a powerful close-up filter (I
covered close-up filters in more depth
Use a coupling ring (shown above) to attach your reversed lens to
another lens. The reversed lens acts like a powerful close-up filter (I
covered close-up filters in more depth 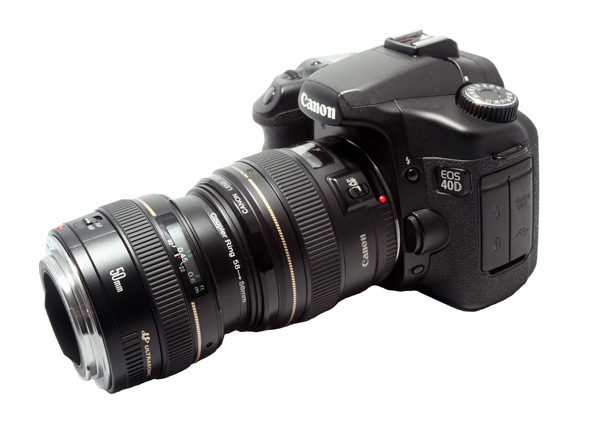


.jpg)


.jpg)


